
| How To Measure Bracelet, Bangles, Cuff And Anklet Lengths For Your Designs By Damaris Ramenaden |
In an earlier blog we looked at typical necklaces lengths and which sizes are best suited for certain outfits. This time we're going to look at how you can measure bracelets and bangles that you're making, to ensure they fit properly and sit where you want them too.
Before we begin, let's make a quick side note about the difference between bracelets, bangles and cuffs.
The term 'bracelet' is used for all designs that feature a clasp that closes the bracelet around the wrist or ankle.
A 'bangle' is used for for all designs that are fully closed with no clasp. These are slipped on over the hand and are typically round or oval in shape, though they can also be other shapes in more contemporary designs.
A 'cuff' is used for all designs that are solid but with a small gap where you wriggle it onto your wrist or arm. Most cuffs have a small amount of flex in them to allow you to squeeze the ends closer or pull more open, for a more comfortable fit.
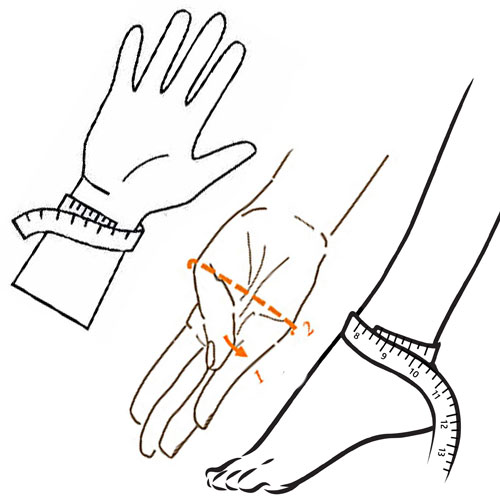
Measuring For Bracelets
The typical size for most bracelets for women is between 7" to 7.5" or 17.5cm to 19cm. This length means the bracelet will usually sit comfortably between the wrist bone and the base of the hand. However this size may not always be a good guide to follow as the style of the bracelet will affect how it fits on the wrist. A thin, delicate chain that measures the same length as a large beaded bracelet will sit in a totally place on the wrist. In this instance, the delicate chain bracelet would sit better as a snug fit around the wrist; therefore it would benefit from being made slightly smaller.
If you are making a bracelet to sell or for someone else, the following table gives a good guide for general sizing:

To measure a bracelet for yourself follow these steps:
1. Take a flexible tape measure (or a strip of paper or ribbon) and wrap it snugly around your wrist where you'd like your bracelet to sit 2. If you are using paper or ribbon, mark the size using a pen, then measure the length using a ruler 3. Add on an extra 2cm or 0.8" to this measurement and make your bracelet (including the clasp) to this revised length |
|
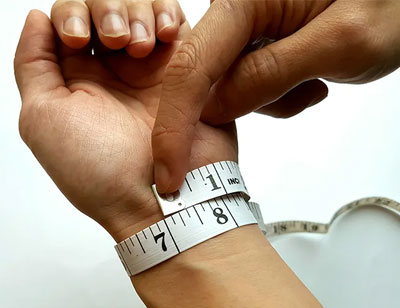
Ideally you should be able to put two fingers between the bracelet and your wrist for a comfortable fit. However, as mentioned above, bear in mind your design - finer, delicate designs may be better as a snug fit, whereas larger designs can be better as a looser fit. Use the guide below to help you measure accurately:

Measuring For Bangles
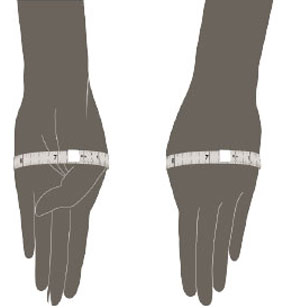
As bangles are a closed piece of jewellery that are passed over your hand, the measurements are based on your hand, not your wrist. Bangles can be measured using either or both the inner diameter (the straight line that goes through the centre point of the bangle, from edge to edge) and inner circumference (the measurement of the complete circle inside the bangle).
If you already have a bangle that fits you well, you can simply measure this to replicate the size. However if you don't you'll have to measure the bangle circumference for yourself:
1. Close your fingers together and bring your thumb across your hand to your little finger - just as if you were putting on a bangle 2. You need to find the circumference of your hand - use a flexible tape measure, paper or ribbon, wrap it around your hand at the widest point. If you're using paper or ribbon, use a pen to mark the measurement, then measure the length using a ruler 3. You can add on approximately 2cm - 2.5cm or .75" - 1" for a comfortable fit and an easy pass over your hand. However, it's important to remember that the size of beads used in your design may impact on the size of the bangle you make; feel free to reduce or increase this measurement as appropriate. |
|
If you are making a bangle for someone else, or to sell, our table gives you some typical sizes to follow:

Measuring For Cuffs
Cuffs are worn by putting the opening of the cuff against the side of your wrist, then wriggling your wrist into the cuff. You can usually manipulate the cuff to make it fit better by squeezing it around the shape of your wrist, or gently opening the cuff gap. However some cuff materials such as acrylic, resin or plexi-glass are not adjustable, so should not be forced into a different shape.
To measure your wrist for a cuff, follow the same guidelines for measuring for a bracelet, then refer to the table below for typical cuff measurements:

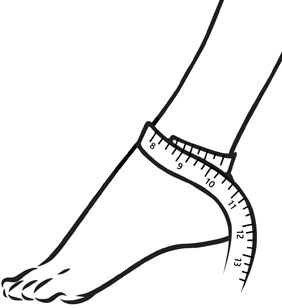
Ankle Bracelets
Anklets are often a popular choice for hand-made jewellery too. Typically, anklets measure approximately 22cm or 9", however the size range can be from 16-27cm or 8-11".
Again, the same rules for bracelets apply when making anklets - the more dainty the style, the smaller the length should be, the bigger the beads or chain, the longer the length (though take care the beads don't become a tripping hazard!).
To measure an anklet for yourself:
1. Take a flexible tape measure (or a strip of paper or ribbon) and wrap it snugly around your ankle (this should be on the ankle bone) 2. If you are using paper or ribbon, mark the size using a pen, then measure the length using a ruler 3. Decide the type of fit you'd like, then refer to the table below to get your anklet measurement |
|

A Final Note - One-Size-Fits-All Bracelets
Sometimes if you don't know how large to make your bracelets, are planning to sell to a mixed audience, or want to make jewellery for children, then a 'one-size-fits-all' approach may be the way to go.
In this instance there are several different ways you can achieve this:
- Bracelets with sliding knots, usually made out of leather, hemp, waxed cotton, rattail or knotting cord are a good choice for many designs
- Wrap-around designs with a fabric section at either end that is knotted together allows the wearer to make it as loose or as tight as they prefer
- Memory wire bracelets can be made as long or as short as you want (great for using us stash beads), as they naturally wrap themselves around the wearer's wrist
- Include an extension chain on your clasp, so the wearer can choose the best fit for themselves
- Stretchy bracelets made with elastic cord are a cost effect way of producing bracelets quickly, and can be stacked for visual attention. These are also great for children to wear as they will break if put under undue strain (such as a child getting it caught on something dangerous)